该篇博文使用 cGAN 实现了 image to image translation,由于 cGAN 可以通过添加条件来指导图像的生成,因此用此图像翻译技术,可以很好的实现诸如图片着色等任务,具体模型参考 此篇论文 。
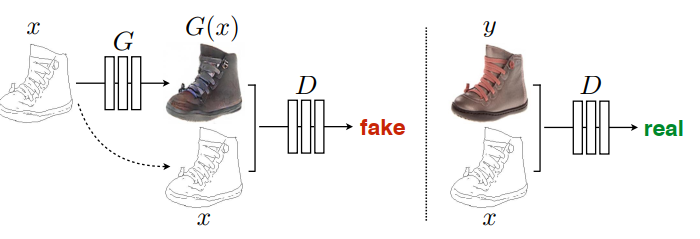
pix2pix 模型使用输入图像(x)作为条件(这里没有噪声输入 z, 可以把 G 的输入 x 看做是噪声 z),学习从输入图像到输出图像的映射,从而得到指定的输出图像。具体过程如下图:
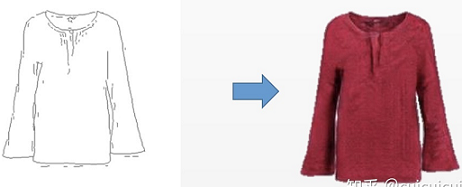
传统图像转换过程中都是针对具体问题采用特定算法去解决,而这些过程的本质都是根据像素点(输入信息)对像素点做出预测(predict from pixels to pixels),pix2pix的目标就是建立一个通用的架构去解决图像翻译问题,使得我们不必要为每个特定任务都重新设计一个损失函数。但是该模型也有一定的缺点,pix2pix在训练时需要成对的图像(x和y),模型学到的是 x 到 y 之间的一对一映射。也就说,pix2pix就是对ground truth的重建:输入轮廓—>经过Unet编码解码成对应的向量—>解码成真实图。这种一对一映射的应用范围十分有限,当我们输入的数据与训练集中的数据差距较大时,生成的结果很可能就没有意义,这就要求我们的训练数据集要尽量涵盖各种类型。以轮廓图到服装为例,我们在自己的数据集上训练好模型,当输入与训练集中类似的轮廓图时得到以下结果:
当我们输入训练集中不存在的轮廓图时,得到以下:
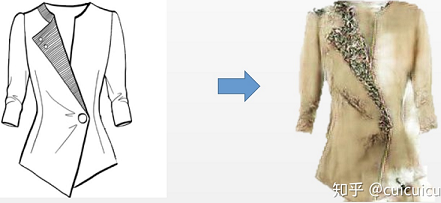
我们可以看出,服装的形态还是可以保持的,但是生成图像的颜色并不能令人满意。
对于这种训练数据需要成对的问题,我们下一篇博文会讲述如何使用 cycleGAN 来解决这个问题。那么,闲话不多说,先上代码来复现一下论文中提到的 pix2pix 模型。
1、数据集图像处理
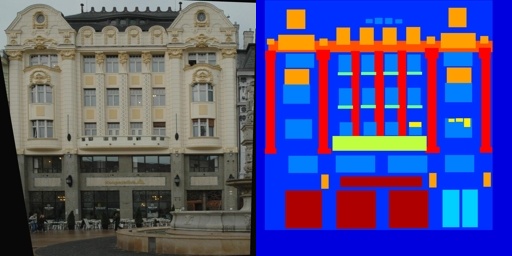
简单起见,我们直接使用论文中的 CMP Facade Database,给定楼房的轮廓生成实际的楼房图,数据集中的样本是一张张 x+y 组成的图片,大小为 256 * 512 像素,左边部分是真实的楼房图片,右边部分是与之对应的轮廓图,如下图所示:
首先要做的是将图片的左右两侧分开,实现函数如下:
1 | def load_image(image_path): |
分开之后,对于每张图片我们可以得到一个 input_image 和 real_image。之后,为了使训练得到的模型更具有适应性,模型训练时每次喂入的样本需要进行随机扰动(先将 256*256 的图像放大到 286*286,之后再裁剪到 256*256)、镜像等操作。论文中是这样描述的:
1、resize an image to bigger height and width
2、randomly crop to the target size
3、randomly flip the image horizontally
具体代码如下:
1 | def resize_image(input_image, real_image, height, width): |
最后,对图像的像素值进行一个归一化操作,将其像素值归一化为 [-1, 1] 之间。
1 | def normalize_image(input_image, real_image): |
总体的数据加载函数如下,包括训练集的加载(需要随机裁剪、镜像)和测试集的加载(不需要任何多余操作)。
1 | def load_train_image(image_file): |
2、构建生成器
生成器是一个 U-net 架构的网络,其结构如下图:
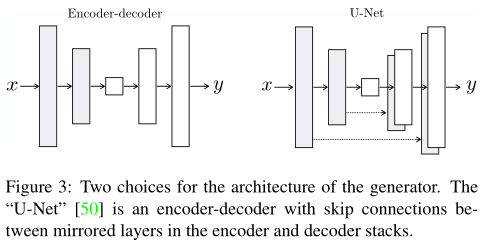
由降采样的编码层和上采样的解码层组成,其中,编码器和解码器的层还会跨层通过 channel 进行拼接,这点和 FCN (全卷积网络)有些不同,虽然它们都可以用来做图像语义分割,FCN 是像素点 add 。
在 Encoder 模块中(降采样)的每个 block 结构为: Conv-->Batchnorm-->Leaky ReLU,代码实现如下:
1 | def downsample(filters, kernel_size, apply_batchnorm=True): |
在 Decoder 模块中(上采样)的每个 block 结构为:Transposed Conv-->Batchnorm-->Dropout(applied to the first 3 blocks)-->Relu,代码实现如下:
1 | def upsample(filters, kernel_size, apply_dropout=False): |
上面关于 encoder 和 decoder 模块的实现方式,采用的是 Keras 的序列模型实现方式。接下来的 generator 采用的就是 keras 的 通用模型实现方式。两者都需要在模型的第一层指定输入的尺寸。
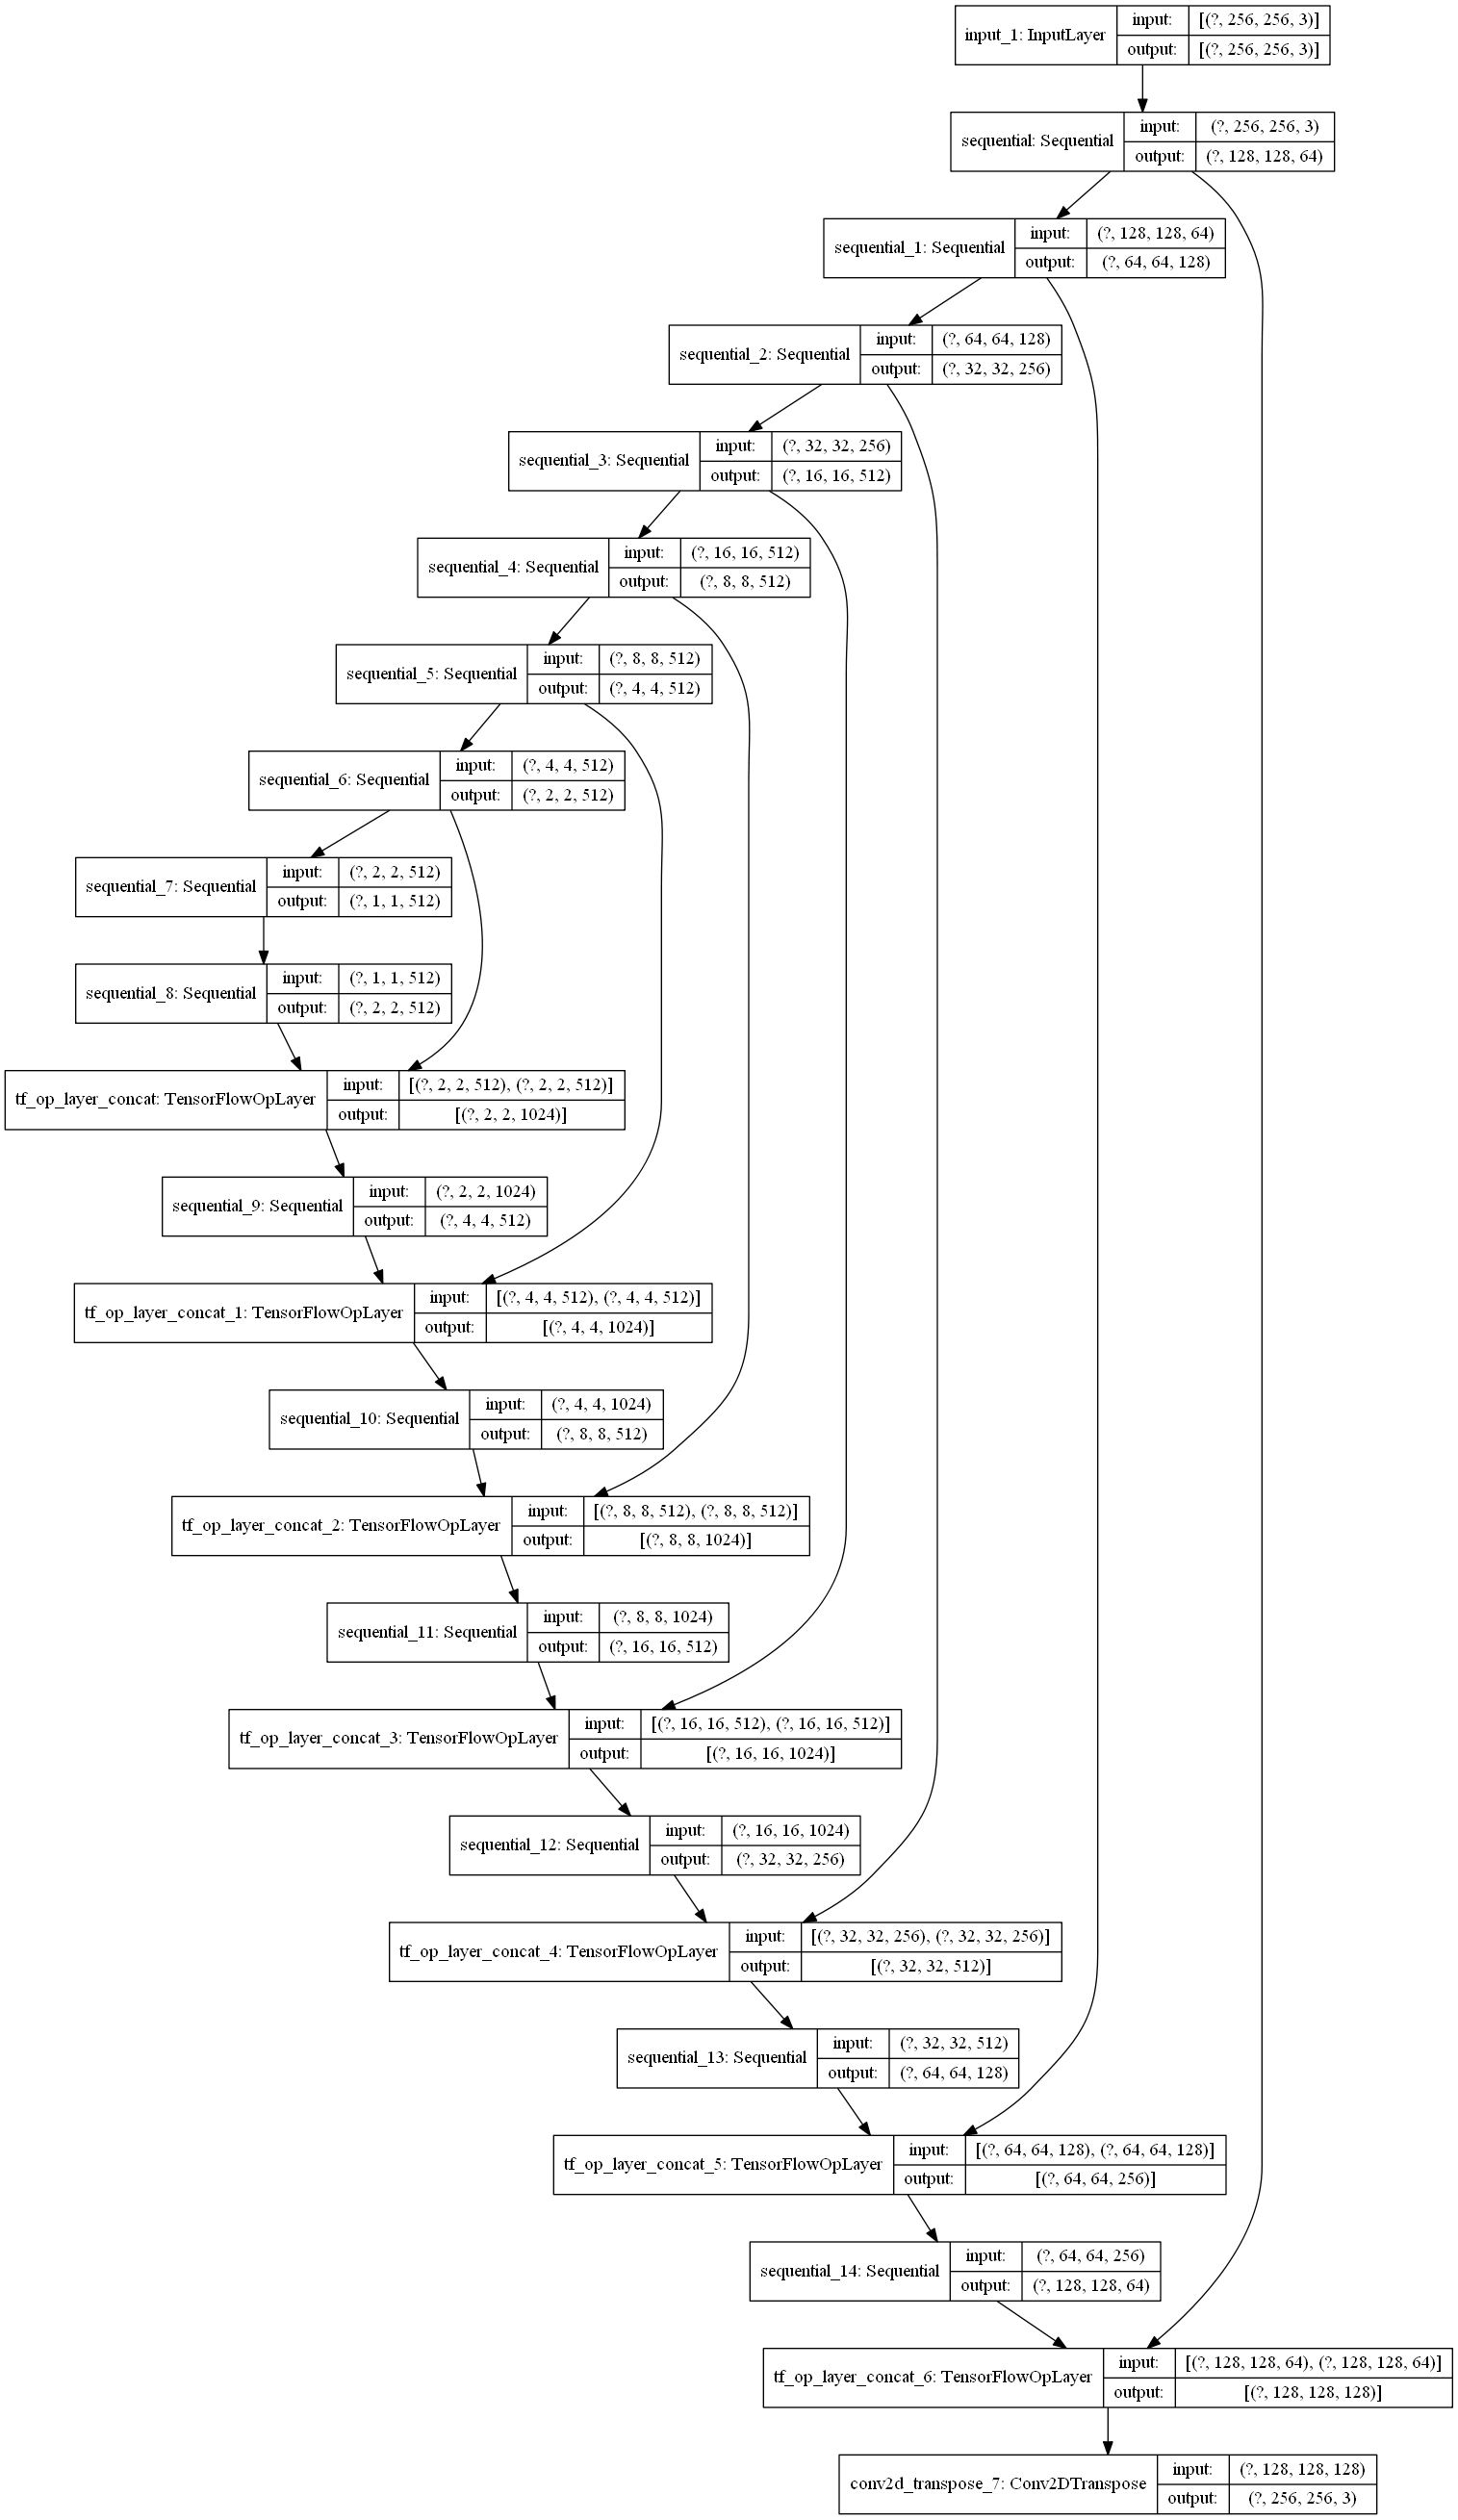
定义好了 Encoder 和 Decoder 模块后,就可以基于此来搭建整个 U-net 架构的 Generator 了。
1 | def Generator(): |
其中第 31 行的 x = tf.concat([x, down_output], axis=3) 就是实现的 skip connection,将两者的 channel 拼接起来。可见,generator 输入尺寸是 256*256*3 ,输出尺寸还是 256*256*3 。generator 的整个架构如下图:
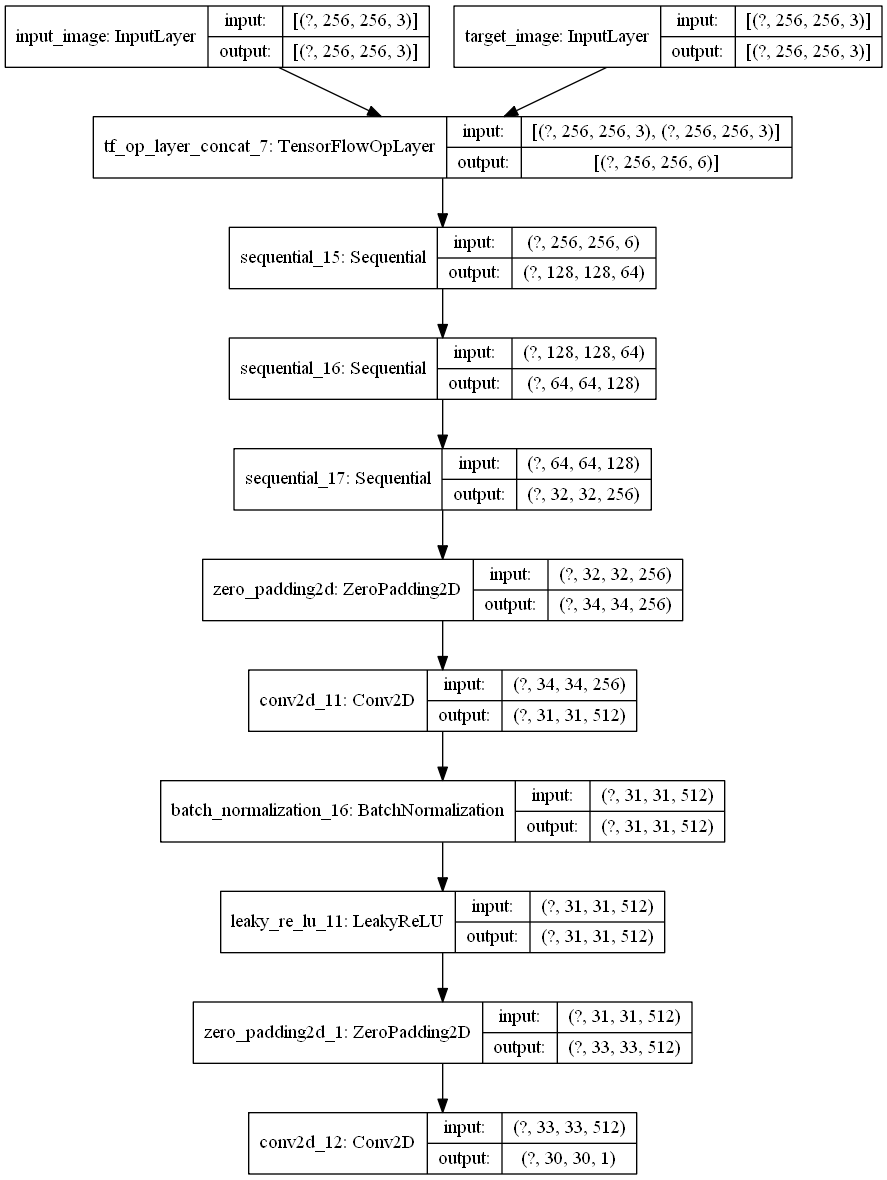
3、构建判别器
判别器接收两个输入,一个是条件(x) input_image,另一个是生成图片generated_image 或者是真实目标图片real_image。对于input_image + generated_image 的组合,判别器应该尽可能的输出全零,相反,对于 input_image + real_image 的组合,判别器应该尽可能的输出全 1。
这里,判别器使用的是 PatchGAN 的架构,最后输出的不再是一个标量值,代表 real 或者 fake ,而是一个 30*30 的矩阵,矩阵中的每个元素是对自己感受野区域receptive field真伪的一个判定,这样的话判别器可以输出更加细粒度的判定结果。
对于 PatchGAN 的理解,可以参阅作者的回答,里面详细介绍了什么是 PatchGAN 以及输出矩阵中每个元素感受野大小的计算等问题。
1 | def Discriminator(): |
整个判别器的架构图如下:
4、定义生成器和判别器的损失函数
pix2pix 说到底还是一个 cGAN 模型,所以其整体的损失函数也和 cGAN 差不多,定义如下:

在 cGAN 损失函数的基础上,加上了生成器 G 的 L1 损失,两部分损失定义如下:

其具体的代码实现很简单,如下所示:
1 | def generator_loss(disc_generated_output, generated_image, real_image): |
5、定义优化器及训练过程
训练过程中,每次喂入一对图像input_image 和对应的 real_image。之后,生成器根据 input_image 生成 generated_image,接着,判别器分别判断input_image + generated_image 和 input_image + real_image,输出 disc_generate_output 和 disc_real_output,计算出 loss 后,计算梯度并更新模型参数。
1 | generator = Generator() |
6、开始训练
定义checkpoint,训练过程中每 20 轮保存一下模型,同时展示每一轮训练后,生成器生成图片的效果。
1 | def train(train_dataset_dir): |
7、效果展示
每次画出 输入图、真实图、生成图,三者形成效果对比,代码如下:
1 | def show_image(generator_model, input_image, real_image, epoch): |

由上图可见,训练效果还不错。
完整代码如下:
1 | # _*_ coding: utf-8 _*_ |
